Sunday, July 15, 2018

Master Forge gas grill rebuild - rusted bottom pan

It must be part ingrained in the male American DNA, to make due with that $99 gas grill until you can drop several hundred on that shiny stainless monstrosity of a backyard monument we call "the grill".  I fell victim to the urge about 7 years ago when the previous one rusted through the carbon steel burners and starting throwing flame to the rubber fuel line on top of the propane tank.  Luckily this didn't end how you might imagine, I saw the errant flame shortly after lighting and shut it down quickly...

My monstrosity.

I went for the "all" stainless Master Forge from Lowe's, a 60,000BTU (the same output of the heat pump that conditions our entire house) 5-burner 15x30" cooking area with rotisserie and side burner.  After 3 hours of assembly, stacks of sheet metal and hundreds of tiny screws, it was together!


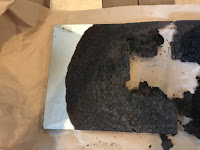
What's left of the bottom catch pan
Flash forward 7 years.   A grill cover has kept it quite good looking on the outside, but the inside was slowly rotting away.  I discovered that the "all" stainless didn't extend to the "all" part.  The catch pan/drip tray was getting quite see-through, and after a few instances of shutting the lid too hard and realizing there was a cascade of rust chips onto my food, I wasn't ready to chuck a $500 grill or pay replacement parts for the same crappy quality parts.


Stainless was obviously plated mild steel
A great go-to place for repair materials of all kinds (https://www.mcmaster.com), I ordered some sheets of 304 stainless to fab some replacements for the catch pan and inner lid shield.  

The new catch pan was two sheets of 18x18x0.036", cut to 16.5"x18", then creased to provide some stiffness.  I cut out a 0.75" bit out of two corners then folded up three edges 0.75" to provide a lip and pan stiffness.  Originally, the 0.036" seemed was too thick to bend, but a 3" offset seamer like https://www.hardwareandtools.com/wiss-ws4-seamer-hand-offset-3-inch-daaa-0019.html did the job to fold up the lips.  Once folded, the 3/4" lip was placed in the vise and hammered to set a good 90 degree angle on the metal.  The mounting holes at the left and right edges were measured and drilled on lip to hang the pan.  I placed some 2x6" pieces on the drip tray guide rails to space up the drip pan and make the pan edge level across the grill.  Once set, I drilled four 1/8" holes in the overlap of the two pan halves for pop rivets to secure them together.
New two part drip pan for the grill, installed with stainless tee nuts and machine screws

The inside lid of the grill was just as bad.  After drilling out the two hinge bolts that were completely rusted solid,removing the lid from the grill and the thermometer from the lid, there were a total of twenty 1/8" rivets to drill out.  The plated steel inner lid was a piece of sheet metal 24.5" x 33.25", I opted to go with the 24" width from the 24x36x0.024" 304SS panel and forgo the extra two bends at the front that put a 1/4" jog in the sheet.   The panel has slots front and back to allow air to circulate along the inside of the lid, these were replicated with a 3/8" drill and a cut-off saw, three along the front and and three in back, that were double the width of the original slots.

After slotting and drilling the front and rear rivet holes (using the old liner as a template), I replicated the front and rear bends and rear lip to attach to the grill cover.  Final step was to transfer the holes for the thermometer and it's surrounding standoffs.  Attach the standoffs to lid fit the new inner lid inside the outer lid, and continue riveting it back together with 1/8" SS rivets.  A final run down to ACE Hardware to get new 5/16"-1" lid hinge bolts, put everything back together.

A brand new grill that will hopefully last for another 10 years, for about $100.

Friday, May 11, 2018

DragonX LED light bar - lights out

DragonX 4 Bar LED mobile DJ Stage Lighting Packages/Portable Par Can Kit Gig Spotlight Bar Set/ Sound Activated Wash Flex Light Party System


Cracking the lid
I purchased this last year for my son's school to use in productions with good result.  This year during practice, the light tree was knocked over after it had been on for an hour or so and when it hit the floor, two of the four light pods went out.  What is this, an incandescent bulb?  No, just some poor engineering.

After I found out about the accident, I brought the pods home and opened them up, six screws around the ring and three on the front plate (the center one can stay in as that holds the lenses into the support ring.
Inside the box is quite straightforward, there's a single layer flexible printed circuit board (FPC) bonded onto a 2mm aluminum plate, and 5 wires coming in from the light tree with a GND, +12v, and RGB signal wires.  The circuit is three parallel PWM circuits for each of the RGB, you can see the power transistors and inductors quite easily.


In not too much time, I discovered the cause of the blackout, the LEDs had been dislodged from the respective traces on the FPC (LED1 for instance).


On looking at the LED package, it's quite hefty with a large metal back for heat sinking.  I realized the FPC had holes cut underneath the LED to thermally bond to the aluminum plate for a heat-spreader.  Then I discovered what had happened.  With little to no heat-sink compound, the LED package had no place to dump heat other than through the leads, and being a thin FPC, there was not much copper in the traces to pull away the heat.  After some period of operation, the LED package go hot enough to MELT THE SOLDER, and when it fell over, the weight of the lens package just above was enough to dislodge the LED in the crash.

I had some Arctic Silver 5 thermal compound around from a recent computer CPU replacement, so after a small dab of that, reset the LED and soldered it back in.  If it came completely off, I found a quick check of the LED with a diode check meter was enough voltage/current to just light the RGB emitters inside and verify polarity/operation.

Once back together, I powered it up and found I was still missing blue on that lamp.  Closer inspection of the circuit, I found an open between LED1 and LED2 on the FPC, so I soldered a wire jumper directly to the LED lead to fix the trace.  I suspect the long high-temp operation may have dissolved the FPC copper trace into the solder bond and what looked like a reasonable re-solder joint was not.

Repaired DragonX light bar