My monstrosity.
I went for the "all" stainless Master Forge from Lowe's, a 60,000BTU (the same output of the heat pump that conditions our entire house) 5-burner 15x30" cooking area with rotisserie and side burner. After 3 hours of assembly, stacks of sheet metal and hundreds of tiny screws, it was together!
 |
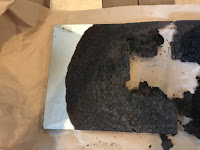
| What's left of the bottom catch pan |
 |
| Stainless was obviously plated mild steel |
The new catch pan was two sheets of 18x18x0.036", cut to 16.5"x18", then creased to provide some stiffness. I cut out a 0.75" bit out of two corners then folded up three edges 0.75" to provide a lip and pan stiffness. Originally, the 0.036" seemed was too thick to bend, but a 3" offset seamer like https://www.hardwareandtools.com/wiss-ws4-seamer-hand-offset-3-inch-daaa-0019.html did the job to fold up the lips. Once folded, the 3/4" lip was placed in the vise and hammered to set a good 90 degree angle on the metal. The mounting holes at the left and right edges were measured and drilled on lip to hang the pan. I placed some 2x6" pieces on the drip tray guide rails to space up the drip pan and make the pan edge level across the grill. Once set, I drilled four 1/8" holes in the overlap of the two pan halves for pop rivets to secure them together.
 |
| New two part drip pan for the grill, installed with stainless tee nuts and machine screws |
The inside lid of the grill was just as bad. After drilling out the two hinge bolts that were completely rusted solid,removing the lid from the grill and the thermometer from the lid, there were a total of twenty 1/8" rivets to drill out. The plated steel inner lid was a piece of sheet metal 24.5" x 33.25", I opted to go with the 24" width from the 24x36x0.024" 304SS panel and forgo the extra two bends at the front that put a 1/4" jog in the sheet. The panel has slots front and back to allow air to circulate along the inside of the lid, these were replicated with a 3/8" drill and a cut-off saw, three along the front and and three in back, that were double the width of the original slots.
After slotting and drilling the front and rear rivet holes (using the old liner as a template), I replicated the front and rear bends and rear lip to attach to the grill cover. Final step was to transfer the holes for the thermometer and it's surrounding standoffs. Attach the standoffs to lid fit the new inner lid inside the outer lid, and continue riveting it back together with 1/8" SS rivets. A final run down to ACE Hardware to get new 5/16"-1" lid hinge bolts, put everything back together.
A brand new grill that will hopefully last for another 10 years, for about $100.
Thanks I got same grill same issue will be re-metaling shortly.
ReplyDeleteI don't have tools to do this would you be willing to sell 1 if these pieces..i have same grill same problem
ReplyDelete